Site Speed Dashboard

![]()
![]()
Site Speed Dashboard is an open source tool developed by DP6 to help you measure performance in your websites. The project is structured in Google Cloud Plataform (GCP) and composed of a JS script that will extract simulated data from Google’s PageSpeed Insights API, and a Python script that will extract real data from Google’s Chrome User Experience Report public dataset in Google BigQuery.
All this data is then stored in BigQuery’s tables and connected to a Google Data Studio Dashboard in order to help you visualize the data and get insights in how to improve performance!
Content
- Disclaimer Crux
- GCP Requirements
- Local Environment Requirements
- Installation
- Configuration
- Dashboard
- How to Contribute
- Support
Disclaimer Crux
This project uses CrUX’s public BigQuery table and, because of that, the project is subject to CrUX’s rules, which are:
- Data update frequency is M-1. That means that the table is refreshed once per month (usually the first tuesday of the month) with data from the previous month. So if you’re querying after the first tuesday of April, you’ll get March’s data.
- Data is extracted only from the origin URL / home page of sites. For example, at CrUX’s table we can find “https://www.dp6.com.br/” but not “https://www.dp6.com.br/servicos/”.
So when you’re replicating this project, take this in note so you’re not suprised if there’s urls missing or your data isn’t being refreshed daily.
GCP Requirements
This project creates resources in Google Cloud Plataform to extract and store data. Because of that, the first requirement is to have a GCP’s project with active billing.
Resources
During terraform’s execution, these resources will be created:
- Cloud Storage
- BigQuery
- Cloud Function
- Cloud Scheduler
And in order for the creation to succeed, you’ll need to active the following:
- Cloud Storage
- BigQuery API
- Cloud Functions API
- Cloud Build API
- Cloud Resource Manager API
- BigQuery Data Transfer API
- Cloud Scheduler API
If you are not familiar with activating resouces in GCP, follow this guide and search for the sources listed above.
Service Account
After the activation, you’ll need to create a Service Account with the following permissions:
- Storage Admin
- Cloud Functions Admin
- BigQuery Admin
- Service Account User
Next Steps
In the next step, you’ll need to run a terraform script. You can use a local environment in order to do so or you can run directly into GCP, using Google Cloud Shell.
We personally recommend using Google Cloud Shell because of its facility, as you don’t need to install anything. If you’re going to use your local environment, check Local Environment Requirements. Otherwise, skip this section.
Local Environment Requirements
In order for the code to run locally, you’ll need to install the following:
- Package zip
- Package unzip
- Package curl
- Google Cloud SDK
- Terraform
After that, you’ll need to set GOOGLE_APPLICATION_CREDENTIALS environment variable with the service account key. You can download this key from GCP, in the same place where the service account was created. If you’re not familiar with setting environment variables, follow this guide.
Installation
Create an API Key
To be able to get PSI data, you’ll need an API key, which you can get in this link, which will automatically create a key and return its value. You can also create an API key directly in the credentials page in GCP.
Running Terraform Script
Clone this project into you local computer or to Cloud Shell.
git clone https://github.com/DP6/site-speed-dashboard.git
After that, run the following:
cd site-speed-dashboard/
sh terraform_deploy.sh
Wait for the code to run and after finishing, check GCP in order to confirm if the resources were created successfully.
Configuration
URLs
The next step is to set the configuration file that was created in Cloud Storage. To do that, access this link and search for a bucket with the name [project-prefix]-sitespeed, with project-prefix beeing the variable of the same name that was set during terraform’s execution.
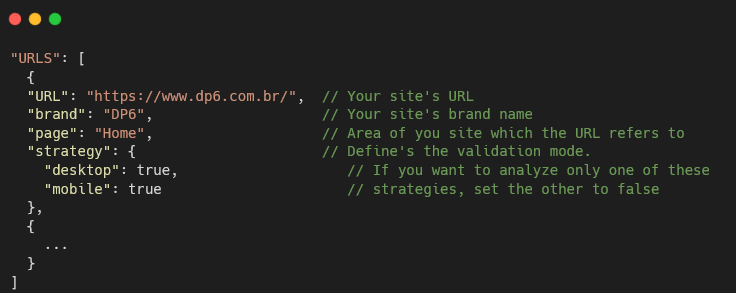
Within the bucket, open the “config” folder, find the “config.json” file and download it. Open the file and edit the URLS array, adding the URLs that you want to analyze in the format shown below.
CrUX Countries (Optional)
In case you want to change in which countries crux data will be extracted, you can also alter the COUNTRIES array, adding or removing countries using the ISO 3166-1 alpha-2 format.
"COUNTRIES": ["br", "fr"] // In this case, Brazil's and France's data will be extracted
Deployment
After finishing the setup, upload the file into the same GCP bucket, overwriting the previous file. After that, the setup is finished and you’ll start collecting performance data on your BQ tables!
Dashboard
After installing and seting up the urls and countries, you’ll have the “back-end” done and ready to work, but you still won’t be able to visualize the data you are collecting. In order to do that, you’ll have to follow through the steps below.
Duplicating Data Sources
In the dataset created in your GCP project, you can find three tables:
- crux_table
- psi_metrics_results
- psi_suggestion_results
Each table will compose a different Data Studio data source and all these datasources will compose the dashboard, that, in turn, will create the data visualization. You’ll have to duplicate all the data sources below:
- CrUX Table - Template [Data Source - Bigquery]
- PSI Table Results - Template [Data Source - Bigquery]
- PSI Table Suggestions - Template [Data Source - Bigquery]
To duplicate, follow the steps below:
-
Click the
icon on the top menu of each data source and then click “Copy Data Source”.
-
Select the GCP project in which you created your site speed dashboard BigQuery tables
-
Select the BigQuery data source created when executing the terraform script
-
Select the corresponding table that matches the Data Studio data source selected
At the end, you’ll have 3 new data sources connected to your tables.
Duplicating the dashboard template
After duplicating the data sources, you’ll need to duplicate the dashboard itself. To do that, follow this steps:
-
Open the Site Speed Dashboard - Template dashboard.
-
Duplicate the dashboard by clicking at the
icon on the top menu and then at
-
Link each Original Data Source to your newly created data sources
-
Click Copy Report.
Now you have a beautiful dashboard ready to be used!
How to contribute
Pull requests are welcome! We will love help to evolve this module. Feel free to browse open issues looking for something you can do. If you have a new feature or bug, please open a new issue to be followed up by our team.
Mandatory requirements
Only contributions that meet the following requirements will be accepted:
Api Docs
Support:
DP6 Koopa-troopa Team
e-mail: koopas@dp6.com.br